On my way to work I found the garage floor was covered in petrol. The tank had leaked.
I mopped it up and checked for drips and went off to work.
When I got back another gallon or so was on the floor.
The leak was coming from the outlet pipe area. I drained the tank properly and remade the tank connection. Easier said than done.
I had to make the first part in 6mm pipe then upsize to 8mm. This was because the nut for 6mm pipe was too short and was fully in before the pipe was clamped tight. The nut for 8mm pipe was a lot longer, so the 8mm pipe was bored to accept a bit of 6mm soldered into it. The 6mm olive would then seat inside the tank and make a good connection.
That was the plan and it seems to have worked so far.
Showing posts with label MkII. Show all posts
Showing posts with label MkII. Show all posts
Friday, 17 August 2007
Friday, 10 August 2007
Engine running problem solved.

I discussed my engine problems with the chaps at work. One contacted his brother in law who suggested it was a leak between the carburettors and the inlet port.
I had a look at all the connections and they looked fine and tight. So it could be the vacuum advance or the engine breather. A finger over the vacuum advance port had no effect so the breather was removed and a 3/8” socket extension stuffed in the hole.
Eureka – the engine runs at a constant speed - very fast but the idle speed was adjusted quickly and Jemima was left to idle and warm up for the first time in 20 years.
The garage filled with smoke from the oil that was burning of the outside of the engine, the exhaust was emitting less smoke now. Actually I’m using leadfree with a slight diesel contamination due to a mistake at the pumps several months ago so a bit of smoke is expected.
The BMW thermostat finally switched on at 99˚C but it was connected to the slow side of the fan so it didn’t have a great effect at first. The lower temp switch doesn’t seem to be working. I switched Jemima off and allowed her to cool down.
Next day I came back to start her up again and all I got was a click from the solenoid again. Out with the starter motor and a recrimp of the stud-winding connection got her restarted again. I’ll change the motor next time.
I had a look at all the connections and they looked fine and tight. So it could be the vacuum advance or the engine breather. A finger over the vacuum advance port had no effect so the breather was removed and a 3/8” socket extension stuffed in the hole.
Eureka – the engine runs at a constant speed - very fast but the idle speed was adjusted quickly and Jemima was left to idle and warm up for the first time in 20 years.
The garage filled with smoke from the oil that was burning of the outside of the engine, the exhaust was emitting less smoke now. Actually I’m using leadfree with a slight diesel contamination due to a mistake at the pumps several months ago so a bit of smoke is expected.
The BMW thermostat finally switched on at 99˚C but it was connected to the slow side of the fan so it didn’t have a great effect at first. The lower temp switch doesn’t seem to be working. I switched Jemima off and allowed her to cool down.
Next day I came back to start her up again and all I got was a click from the solenoid again. Out with the starter motor and a recrimp of the stud-winding connection got her restarted again. I’ll change the motor next time.


Tuesday, 17 July 2007
Samson back from the dead.

In 1985 I bought a blue Samson unlimited warranty battery.
Like a lot of people at the time, I wanted a good battery and as we planned to keep the car, the "as long as you own the car" warranty sounded ideal.
Despite keeping the battery trickle charged and the occasional drain it had no chance of lasting the intervening 20 years but it had a good go.
I had "heard" on the web that it wasn’t easy anymore to get replacements and Unipart wouldn’t honour the warranty anymore. But nothing ventured - nothing gained. I contacted the local Partco who were not in the least bit helpful and gave every excuse not to replace the battery, "GBY5603 - Sorry not on my list anymore. Will have to sell you a 3 year warranty battery instead" "We don't like the blue ones..."
So I set the Rottweiler on them. She contacted head office and found a nice girl who was perfectly happy to arrange an exchange for us and contacted the local Partco to tell them off and arranged a new one for collection. We went round and collected a very nice period looking, black, Unipart, 3 year warranty Battery. And the lifetime warranty continues as well, bonus.
Good result, Thanks to the wife and Unipart HQ.
Like a lot of people at the time, I wanted a good battery and as we planned to keep the car, the "as long as you own the car" warranty sounded ideal.
Despite keeping the battery trickle charged and the occasional drain it had no chance of lasting the intervening 20 years but it had a good go.
I had "heard" on the web that it wasn’t easy anymore to get replacements and Unipart wouldn’t honour the warranty anymore. But nothing ventured - nothing gained. I contacted the local Partco who were not in the least bit helpful and gave every excuse not to replace the battery, "GBY5603 - Sorry not on my list anymore. Will have to sell you a 3 year warranty battery instead" "We don't like the blue ones..."
So I set the Rottweiler on them. She contacted head office and found a nice girl who was perfectly happy to arrange an exchange for us and contacted the local Partco to tell them off and arranged a new one for collection. We went round and collected a very nice period looking, black, Unipart, 3 year warranty Battery. And the lifetime warranty continues as well, bonus.
Good result, Thanks to the wife and Unipart HQ.
Friday, 13 July 2007
Underneath stuff
This week Jemima is back on axle stands.
The plan was to fit the exhaust, clutch slave cylinder and new rear bumper.
None of which was easy.
Couldn’t find a bolt that would fit the slave cylinder mount. Then realised they are 3/8" UNC, not UNF, so bought some new ones from Namerick. When I got back, the next bolt out of my used nut/bolt box was 3/8" UNC.
Couldn’t find the bumper support bars anywhere, they were only painted last month, so started on the exhaust.
The manifold mount fitted easily enough but none of the others did. Drilled a new hole in the boot floor for the rear mounting. Then found the bumper support bars and realised they would be in the way of the exhaust.

The rear bumper irons and triangular reinforcing bracket use four bolt holes each. Three in the boot floor and one in rear lower panel. None of which really lined up. Boot and rear panels are "new" and came with holes pre drilled but not quite in the right place.
Six more holes were drilled in the boot floor to fit all these bumper supports. Then the bumper itself was not very central so more holes where drilled in the spring bars to sort that out.
I liked the look without the overiders fitted but "she - who must be obeyed" wanted the overiders. Naturally the original ones would look silly so new ones were ordered.
Drilled new holes for some M6 Rivnuts in the rear bulkhead for the centre exhaust mounting and reversed the rear mount to still use the hole drilled previously.
So, three 5 minute jobs, which took about a week.
The plan was to fit the exhaust, clutch slave cylinder and new rear bumper.
None of which was easy.
Couldn’t find a bolt that would fit the slave cylinder mount. Then realised they are 3/8" UNC, not UNF, so bought some new ones from Namerick. When I got back, the next bolt out of my used nut/bolt box was 3/8" UNC.
Couldn’t find the bumper support bars anywhere, they were only painted last month, so started on the exhaust.
The manifold mount fitted easily enough but none of the others did. Drilled a new hole in the boot floor for the rear mounting. Then found the bumper support bars and realised they would be in the way of the exhaust.

The rear bumper irons and triangular reinforcing bracket use four bolt holes each. Three in the boot floor and one in rear lower panel. None of which really lined up. Boot and rear panels are "new" and came with holes pre drilled but not quite in the right place.
Six more holes were drilled in the boot floor to fit all these bumper supports. Then the bumper itself was not very central so more holes where drilled in the spring bars to sort that out.
I liked the look without the overiders fitted but "she - who must be obeyed" wanted the overiders. Naturally the original ones would look silly so new ones were ordered.
Drilled new holes for some M6 Rivnuts in the rear bulkhead for the centre exhaust mounting and reversed the rear mount to still use the hole drilled previously.
So, three 5 minute jobs, which took about a week.
Sunday, 11 February 2007
Hydraulics, and Instruments


Today it was time to fit the brake pipes and hoses. Copper pipes were fitted 22 years ago and, as expected, they are still in perfect condition.
I also fitted Goodridge braided hoses. These were bought, but not fitted, 15 years ago! Fortunately they claim to be guaranteed forever. We'll see if they last that long.
Whilst crawling around under the car to fit the rear pipes and hoses, I found it rather difficult to get back up again, wedged as I was between car and garage wall. Maybe I need to fit some some of those handles that usually adorn old folk's bathrooms.
It being rather chilly outside, I also cleaned up the Speedo and Tacho, ready to fit to the dashboard. The dashboard was painted many years ago using the original looking crackle finish paint. It took 3 goes to get any crackles in the paint. It needed to be done in the right temperature environment. "She" wouldn't let me do it in the house so I took it to work. The results were superb.
Decided it would be nice to see the Dashboard fitted today, so began the task. Then found it wouldn't fit due to the door seals (see earlier post) and the windscreen bolts had bowed the dash top, such that the centre section wouldn't bolt in place. This explains why the windscreen centre bolts had two gasket/spacers fitted in the dash top. Both are now fitted and the dashboard looks fine - except the door seals are hanging off again.
I also fitted Goodridge braided hoses. These were bought, but not fitted, 15 years ago! Fortunately they claim to be guaranteed forever. We'll see if they last that long.
Whilst crawling around under the car to fit the rear pipes and hoses, I found it rather difficult to get back up again, wedged as I was between car and garage wall. Maybe I need to fit some some of those handles that usually adorn old folk's bathrooms.
It being rather chilly outside, I also cleaned up the Speedo and Tacho, ready to fit to the dashboard. The dashboard was painted many years ago using the original looking crackle finish paint. It took 3 goes to get any crackles in the paint. It needed to be done in the right temperature environment. "She" wouldn't let me do it in the house so I took it to work. The results were superb.
Decided it would be nice to see the Dashboard fitted today, so began the task. Then found it wouldn't fit due to the door seals (see earlier post) and the windscreen bolts had bowed the dash top, such that the centre section wouldn't bolt in place. This explains why the windscreen centre bolts had two gasket/spacers fitted in the dash top. Both are now fitted and the dashboard looks fine - except the door seals are hanging off again.
Tuesday, 6 February 2007
Windscreen, and number plate light.

New seals obtained from sussexclassiccar. These seals go under the windscreen, where it bolts to the body. Problem being, these seals are new and don't compress, so I couldn't fit any of the 4 bolts that hold the screen on.
Struggled for ages, then gave up. I cut some rubber matting to the right shape and fitted the screen without problem.
The number plate plate lamp was next. I had fitted the plinth some time ago. As usual this had to be removed to fit the light. Then the new light unit has M5 studs not 3/16". Another trip to the shops for some nuts to fit. With the wires soldered and the earth bolted to the boot lock support, it should work if I ever get to fit a battery.
Sunday, 4 February 2007
Windows, easy to get out, hard to get in.


I've been avoiding the passenger's window ever since I fitted the drivers window. It took a whole day to fit it. I should have done the passenger window straight away while the process was clear in my mind.
Two hours later it was done! Easy! The quarter light goes in first, Then loosen the channel by the door lock. Wind the winder until the winding mechanism is as far to the rear as possible then remove all 8 bolts. Shuffle the window and winder about until it all joins up and re-bolt.
It's a good idea to fit the right angle bracket at the end of the quarter light channel before putting in the window. Darn tricky otherwise.
Then found that the windscreen doesn't really line up that well with the quarter lights. So it had to come off again. Needed some new seals anyway.
With the wiring loom in yesterday, I offered up the dashboard. Its rather tight and the steering wheel and shaft had to come off as well.
Net result, 2 things on, 2 things off.
Great...

Two hours later it was done! Easy! The quarter light goes in first, Then loosen the channel by the door lock. Wind the winder until the winding mechanism is as far to the rear as possible then remove all 8 bolts. Shuffle the window and winder about until it all joins up and re-bolt.
It's a good idea to fit the right angle bracket at the end of the quarter light channel before putting in the window. Darn tricky otherwise.
Then found that the windscreen doesn't really line up that well with the quarter lights. So it had to come off again. Needed some new seals anyway.
With the wiring loom in yesterday, I offered up the dashboard. Its rather tight and the steering wheel and shaft had to come off as well.
Net result, 2 things on, 2 things off.
Great...
Saturday, 3 February 2007
Too Many Wires...


It's cold outside, so I thought it would be a good time to deal with the wiring loom.
Somewhere over the last 20 years I seem to have lost the "original" wiring loom. I bought another from eBay but it was too different to what Jemima needed. So, feeling flush, I bought a new loom from sussexclassiccar . Then spent a few days thinking about how to modify it.
I need to re-do the mods for negative earth and the alternator conversion, which I first did years ago. Then I'll fit the Toad Powerkey immobiliser, electric washer, reverser switch & lights, Fog light and multi way fuse box.
So I thought about it some more and then started cutting up the old loom for parts. The original control box was modified to contain 2 fuses by removing the internals and adding a few links underneath. This article gives some of the idea.
The immobiliser has two switching circuits. One circuit cuts the supply to the starter solenoid and the other cuts power to something else ( I'm not saying - just in case) hopefully when I come to try to start the car it will work as designed and detect the "magic" keyring.
As I now have reversing lights on Jemima, I used the rear portion of the old loom and spliced it onto the new loom with some minor changes.
Somewhere over the last 20 years I seem to have lost the "original" wiring loom. I bought another from eBay but it was too different to what Jemima needed. So, feeling flush, I bought a new loom from sussexclassiccar . Then spent a few days thinking about how to modify it.
I need to re-do the mods for negative earth and the alternator conversion, which I first did years ago. Then I'll fit the Toad Powerkey immobiliser, electric washer, reverser switch & lights, Fog light and multi way fuse box.
So I thought about it some more and then started cutting up the old loom for parts. The original control box was modified to contain 2 fuses by removing the internals and adding a few links underneath. This article gives some of the idea.
The immobiliser has two switching circuits. One circuit cuts the supply to the starter solenoid and the other cuts power to something else ( I'm not saying - just in case) hopefully when I come to try to start the car it will work as designed and detect the "magic" keyring.
As I now have reversing lights on Jemima, I used the rear portion of the old loom and spliced it onto the new loom with some minor changes.
Tuesday, 26 December 2006
A Brand New Coat

The Midget was sent to Riverside. "I'm in no hurry" I said and went to Seattle, then China, Helsinki and Madrid.
About 6 months later the midget was ready.
Now in her original colour again, British racing Green (GN29), Jemima looked superb. Time at last to start putting her back together. All the bits taken off 20 years ago, painted and wrapped and boxed were finally required once more.
The problem is what order do you fit these things? The first things off, and painted, are probably the last things to refit but I was keen to make an impression. So I fitted the heater and fan. Then took the fan off again as the fuse box was underneath, and I couldn't fit the pedal box with it fitted.
Next I fitted the lights, this I decided would be easy and would help make Jemima look like a real car again. And then the windscreen, which came with some shims, which I couldn't remember where they went. After fitting it I read the book "Original Sprite and Midget" and had to take it off again and put them in the right place (between the aluminium post and body, not as posh washers for the bolts).
The boot seal was fitted and the door seals, then I found the doors wouldn't close. This was a big problem. The seal was cut and modified and eventually the body (near the A post) was walloped with a large hammer. The door would close now but the fit wasn't as good.
This isn't going to be an easy jigsaw to assemble...
Sunday, 3 December 2006
A Double Garage
I've just come back from a week in Madrid, another reason for maybe not working on the car. Maybe going again later in the week.
Anyway back to the story,
This time when we moved house we got a double garage. Space for Jemima and for the TR5 I bought a little earlier. Unfortuneatley The TR5 and the daily his-'n'-hers drivers (VW camper, Bedford Rascal) took up quite a bit of time to keep them going so Jemima was neglected quite a bit longer than was intended.
http://wolff.mysite.wanadoo-members.co.uk/tr5/images/DSCN1634.jpg
The TR5 was sold in 2003, the VW and Rascal went a year later.
Now there was no stopping me...
Anyway back to the story,
This time when we moved house we got a double garage. Space for Jemima and for the TR5 I bought a little earlier. Unfortuneatley The TR5 and the daily his-'n'-hers drivers (VW camper, Bedford Rascal) took up quite a bit of time to keep them going so Jemima was neglected quite a bit longer than was intended.
http://wolff.mysite.wanadoo-members.co.uk/tr5/images/DSCN1634.jpg

The TR5 was sold in 2003, the VW and Rascal went a year later.
Now there was no stopping me...
Saturday, 25 November 2006
Packed away
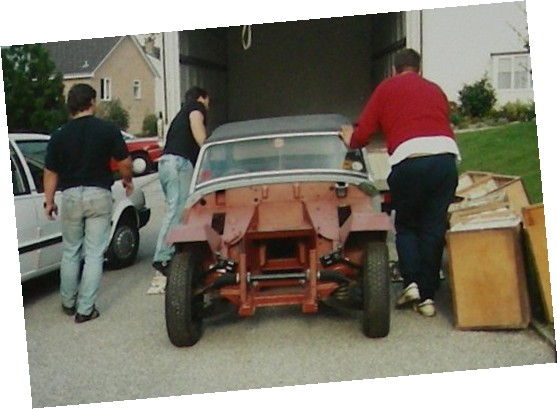
After 3 years in Cornwall, Jemima was rolling again with lots of new metal but it was time to return from whence we came.
She was packed in a van with all the usual household stuff and rolled into her new garage the next day.
Not a lot happened for a few years, except I would spot some rust and rub it off, and paint it, then some time later it would come back again, so it was rubbed off, again, and painted.
Once the house was finished, and I had rested, redecorated the house, and rested again, I ventured back into the garage for some serious work on Jemima.
The underneath was sealed, the back axle cleaned and painted, wings fitted and a new bonnet was bought (and not fitted).
This activity didn't last long.
And then we moved house again.
Sunday, 19 November 2006
Stripped naked...
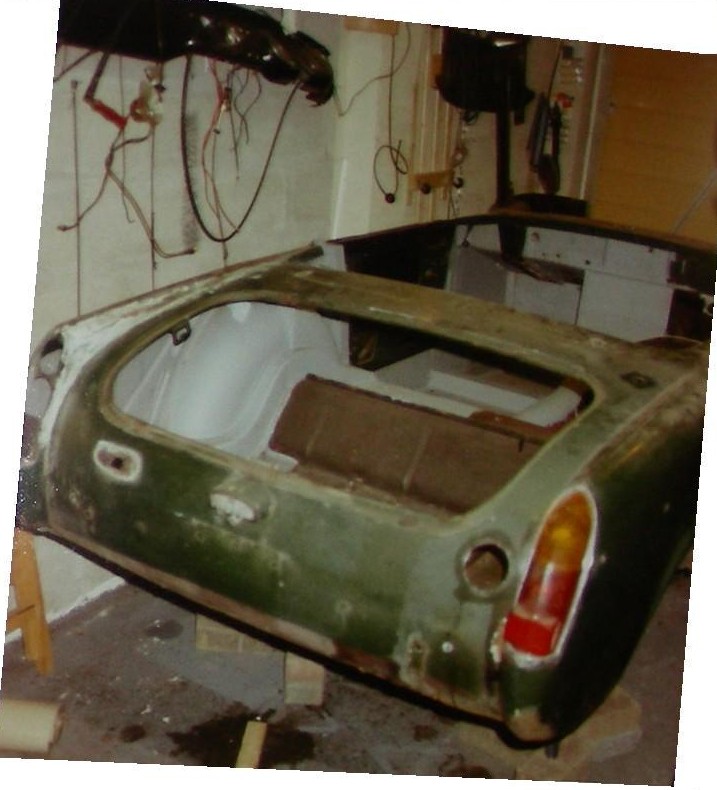
Jemima was stripped naked, and all her rust was exposed. It may have been a bigger job than I originally thought but it doesn't explain the 20 year time scale.
Over a few years her bits and pieces were cleaned and bagged, lost, found, lost again or distributed all over the house.
The rusty bits were then replaced with non-rusty bits. Many new panels were used in this lengthy period of bashing and welding. In those days, a new complete bodyshell wasn't available. Now it is - although not in the MkII form. It may have been an easier starting point, but it wouldn't be Jemima.
Jemima, you see, has been in the family for some time. She was purchased by the wife when she was 17, it was her first car. A super banger even then, but she looked good.
For a while...
Until some work revealed a large lump of wood where the sill should be...
Subscribe to:
Posts (Atom)